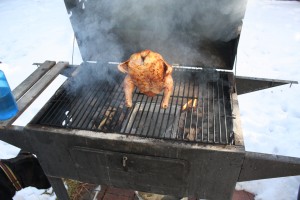
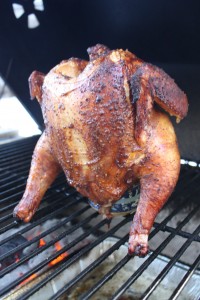
How to Make Beer Can Chicken Recipe
 Beer Can Chicken is such a delicious recipe to make that is pretty easy–put the rub on the chicken, set up the beer can then set up your grill for indirect heat and after that just keep an eye on your temperature and maintaining your fire so the temperature doesn’t drop inside the barbecue and you have yourself an easy but delicious main dish!
A typical whole chicken is plenty of food for a main dish for 6 people but we’ll often make one for two of us and use for various leftovers the next two days. Since it takes awhile longer to make we sometimes like to do it on a Saturday or Sunday and then have leftovers for great sandwiches the next day and a Chicken salad or chicken enchiladas the following day….the possibilities are endless.
This recipe is best over a charcoal grill but you can also modify over a gas grill as well.
Beer Can Chicken Ingredients:
- 1 Whole chicken
- 12 ounce can of beer
- Rosemary, Sage & Oregano 1-2 Tbs each (Optional)
- 1/3 cup Barbecue Rub (We use our Mama Rub Recipe but any commercial rub such as John Henry’s Pecan Rub works fine too if you prefer not to make your own rub or don’t have time to).
- Beer Can Stand (Optional, but recommended)An affordable option from Amazon with good reviews: Bayou Classic 0880-PDQ Stainless-Steel Beercan ChickCAN Rack

Beer Can Chicken Recipe Instructions:
1. Prep your chicken. Leave skin on but loosen the edges so you can slide rub under the skin to give extra flavor to the chicken. (See video below from 0:19-0:38 seconds if you need visual). Once you have loosened the skin, take rub and apply to chicken underneath the skin and some inside they cavity, approximately 1-2 Tablespoon of total rub using, depending on size of your chicken. Setting aside 1 Tablespoon of Rub, apply rest of rub liberally to the outside of the chicken. NOTE: Make sure you have poured the 1/3 cup of rub into a side container and you are not just reaching into the rub container to avoid bacteria issues.
2. Take beer can and open it. Pour out half the beer (or pour it into a cup if you drink beer and set aside to enjoy as you make the recipe). Remove the tab used for opening the beer. Take a beer can opener and use the wedged side of it for poking holes around the outside of top of can. NOTE: Aluminum is obviously very sharp. Be very careful when doing this step to avoid slicing your hand. Add about 1 tablespoon of your rub into the beer can.
 3. Optional: We love to infuse a little more flavor into our chicken besides just the rub. If you have an herb garden (which we highly recommend!) or have some extra herbs lying around, rinse them off and then tear into small pieces and put into the remaining beer in the beer can. We have plentiful Rosemary, Sage and Oregano in our gardens and like to put a few pieces of them into the can. Approximately 1 tablespoons each. If you are in a hurry, skip this step. It is not necessary just adds a nice touch.
4. Set up beer can and the chicken on the stand (See video below from minutes 1:26 to 1:50 for a visual if desired). You can barbecue beer can chicken without the stand but it is a lot easier to tip over and so we highly recommend using the stand for more stability.
5. Soak wood chips for half an hour to an hour in a bowl of water.
6. Set up your grill for medium-hot indirect grilling and add wood chips to coals if on charcoal grill. (See video from minutes 1:56-2:46 for demonstration). If on a gas grill, there are smoker boxes out there that you can use to get the wood smoked flavor infused into your meal as well.
7. Place Beer can chicken on grill over indirect heat sitting directly over drip pans to preserve your barbecue. Close lid of barbecue (with vents open) to create an “oven effect” with the grill area. .
8. Cook the chicken for about 1.25 – 1.5 hours total cooking time until the internal temperature reaches about 165°F. After about an hour you will probably need to add about 8-10 fresh coals and a handful of wood chips to each side of your grill to maintain ideal temperature.
9. Remove the chicken from the grill, place on a sheet pan or cutting board, and immediately cover with aluminum foil to rest for 10-15 minutes. Afterwards, carefully remove the beer can from the chicken paying attention to not spill or burn yourself on the hot messy liquid inside the can. Typically the best way to do this is using two sets of tongs, one for holding the chicken and the other to grab onto the hot beer can and/or stand to pull it out. Throw away the beer can once you’ve successfully removed it from the chicken.
10. Carve up the bird and serve!
Do you enjoy more visual instruction? Watch Jim as he walks you through the process. Note: in this video he will explain a lot more of the details to help give you pointers. The first time you barbecue a whole chicken it can be a little daunting–so listen to his helpful tips and you’ll have it down in no time!
Tags: Barbecue, Barbecue Blog, Barbecue Chicken, BBQ Blog, BBQ Chicken Recipe, Beer Can Chicken, Whole Chicken Recipe


2 People have left comments on this post
Looks pretty tasty..I just might have to order the rack thingies, thanks
The racks are definitely great to have around and such a cheap investment in grill equipment if you make beer can chicken often. We feel a lot more comfortable walking away from the birds while indirect smoking, knowing that it is better balanced on a rack and less likely to tip over. 🙂
Sorry, comments for this entry are closed at this time.